Sunday, September 13, 2009

Alchemy....

...or close enough!

This weekend I played with highschool chemistry, in the form of electroplating with copper. Good geeky fun that I highly recommend for all. Its simple, cheap and fun. Rather than go in to lots of details of how electroplating copper works, ill let wikipedia do that. I'll just give you a storybook step by step on how to you can do this at home. 

First get some copper wire. 10-14 gauge works well because its thick enough to hold up fairly well but thin enough to work with pretty easily.   


I built my cathode by soldering an alligator clip to a section of the copper wire, and adding a section of heat shrink tubing to insulate it from the lid of the jar. Leaving a section of insulation would work to if you're starting with insulated wire. I forgot so I had to add the heat shrink.


For electrolyte I used distilled white vinegar, its cheap, easy to get and not all that dangerous when compared to other acids.


For my cathode I made a visually appealing spiral around the inside of the jar, this is not necessary any shape that keeps it from touching the anode will work. 


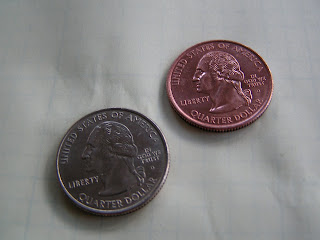
Next a subject. I chose a quarter since its small and the outer surface is Nickel which plates well and is often used as a strike (starting point) in preparation for plating other metals.


I had this solar panel from a garden light that I disassembled after it stopped working, mostly due to water spots making the cover opaque. The panel puts out about 1 volt which is good enough for copper plating.


Next fill the jar with vinegar and water about 50/50, add your electrodes (I hot glued mine to the lid and then just screwed the whole assembly into place.) and attach the solar panel. Put the whole thing in the sun and come back in an hour or so.


The results are pretty impressive:

copper plated quarters


copper plated quarter back

Friday, July 24, 2009

LCD Madness!

Last night I received a package from http://adafruit.com/ so today I took off work early to play with my new toy.

[caption id="attachment_50" align="alignnone" width="300" caption="lcd hooked up to an arduino"]lcd hooked up to an arduino[/caption]

I cannibalized an old floppy drive ribbon cable to build a custom cable to hook the LCD up to my arduino. I then downloaded Adafruit's improved lcd library for arduino and now I can output 32 characters worth of data from my arduino.

I'm planning a project that will need the lcd so stay tuned....

Sunday, June 14, 2009

Revenge of the Hanging Tomatoes (Part 1)

So this year I decided that the hanging tomatoes need larger root balls. Which means larger hanging planters. So I went to OSH to find bigger planters. After schrounging trough their entire gardeing supply section I was unsatisfied with all of the options available to me. I then decided to purchase the commercial solution, "Topsy Turvy Tomatoe Planter", which OSH didn't have. I ended up getting mine from Rite-Aid for about $12 each.  [gallery]

I could only get my hands on two of the TTT planters so I Improvised with a large pot and a stand for the sandwitch tomato. We will see if that is enough soil for it. I sorta doubt it.

Monday, May 11, 2009

Forge Update

So finally after months of idleness Matt and I have got back to work on the forge.  Last time I posted we had simply stacked the bricks and a lot of propane was leaking out between the cracks. At that point we were planning on buying a 55lb bag of refractory cement and only using a very small portion for this project. Since then we found small containers of pre-mixed fireplace mortar which seems to be working for now:


Now that most of the flame is contained inside the forge we were able to get some 12 gauge copper wire heated to "red hot" which is about 650 degrees C or 1200 degrees F. Not nearly the 1080 or so degrees C needed to melt copper, but a good start.

It seems like the next hurtle will be coming up with a better "burner" as our "sidewalk torch" is producing too much turbulence inside the furnace. So much turbulence that increasing the propane above a certain point actually lowers the temperature inside.

For now more pictures:

[gallery]

Monday, April 13, 2009

Building Moisture Sensors

This weekend we built a couple of resistive moisture sensors. While I cannot claim to have come up with the idea, I am nonetheless proud of building these moisture sensors from scratch. The basic principle is simple, embed two electrodes (wires) in Plaster of Paris which drys solid but porous. When dry the sensor will have infinite resistance (i.e an open circuit) but when placed in damp soil the plaster will absorb some of the water and the resistance will drop down into the 100 kilo-ohm level. By applying a voltage to the sensor and measuring the voltage drop across it you can get a pretty good idea of how moist it is.

Here is a series of pictures showing the construction process (which I will describe below)

:[gallery]

We had some 20 gauge uninsulated wire laying around which we decide would make decent electrodes for these sensors. If I were to do it again I would try to find some insulated wire so that I would only need to strip the ends instead of heat-shrinking most of the wire.

The first step was to modify some electronic header material for use as spacers. We broke four two pin sections off of the header and pulled out all of the pins. Next we enlarged the holes for our 20 gauge wires. If I do this again I will also try to find 22 or 24 gauge wire so I don't need to enlarge the holes in the spacers.

Once the wires were inserted into the spacers and bent to hold the spacers in place, we added two types of heat-shrink a small diameter tube around each of the wires and a larger diameter to hold the two wires together.

Next we taped one end of our straw sections closed and filled them with Plaster of Paris. Into this mess we inserted the bare wires and spacer construction.

Then wait... and three hours later sensors are ready. I used an exacto knife to cut off the straws and then let the sensors dry for a couple more hours.

Ta-Da cheap moisture sensor.

Tuesday, February 3, 2009

Experiments in Metallurgy


So we built a small forge this weekend. It still needs some refactory cement to fill the gaps between the bricks but with any luck we should be mealting down copper for lost wax casting soon. We also designed and build the table its sitting on. All in an afternoon of mad sciency doom.

The forge will be fairly inexpensive when its done. The bricks we got second hand off craigs list for 2.50 a brick. Which is pretty cheap for firebrick. So a dozzen bricks cost us only $30. The refactroy cement will cost us something like $60 for a 55lb. bag.  Our heat source is a "sidewalk torch" that we got from Harbor Freight for under $20, they have soo many cheap tools. So not counting time and energy the forge itself will cost just over $100 which in not bad at all for a small forge.

Good weekend.

Thursday, January 8, 2009

Mad Science Runs in The Family

I was going through some pictures I took back in 2006 when I was in Germany, and I found some neat ones I want to share. You see, it turns out my great grandfather was somewhat of a pioneer in early photography. I wish I could remember the model of camera in these pictures but the important thing to know is that it was very early in the history of Photography.  The camera below was built before the advent of a shutter. Pictures were exposed by first covering the lense with a hankerchief or hat then removing said hat for a few seconds and then replacing it. My great grandfather got fed up with the lack of control of this process and added a custom shutter to his camera.

[gallery]

In these pictures you can see, the camera from the front, the shuter in the open position, the shutter in the closed position, and the handbrake from a motorad (motorcycle) that great gramps used to control the shutter.